Disclosure: some links in this post are affiliate links. If you buy through them, we may earn a commission at no extra cost to you. As an Amazon Associate, we earn from qualifying purchases. We only recommend gear we would put on our own trucks.
A truck lift kit is the most visible thing you can do to a truck and the modification most likely to create problems you did not sign up for. Done right, it makes room for the tires you actually want and straightens out the factory nose-down stance. Done wrong, it costs you a driveshaft, a set of CV axles, and an equipment ticket.
Most of what gets written about lifts skips the parts that decide whether you are happy in a year: what a lift does not do, what California actually regulates (it is not what most people repeat), and what has to be replaced alongside the springs once you pass about three inches.
Here is the whole picture, on three budgets.
In this guide
- What a lift actually does, and what it does not
- The three kinds of lift
- What California law actually says
- What breaks when you go up
- Tires, gearing, and the speedometer
- Doing it on three budgets
- What you need before you start
- Frequently asked questions
- The bottom line
Vince’s own build photos for this guide are being added.
What a lift actually does, and what it does not
A lift raises the body and frame relative to the axles. That is the whole mechanical description, and it is worth sitting with, because it rules out the thing most people think they are buying.
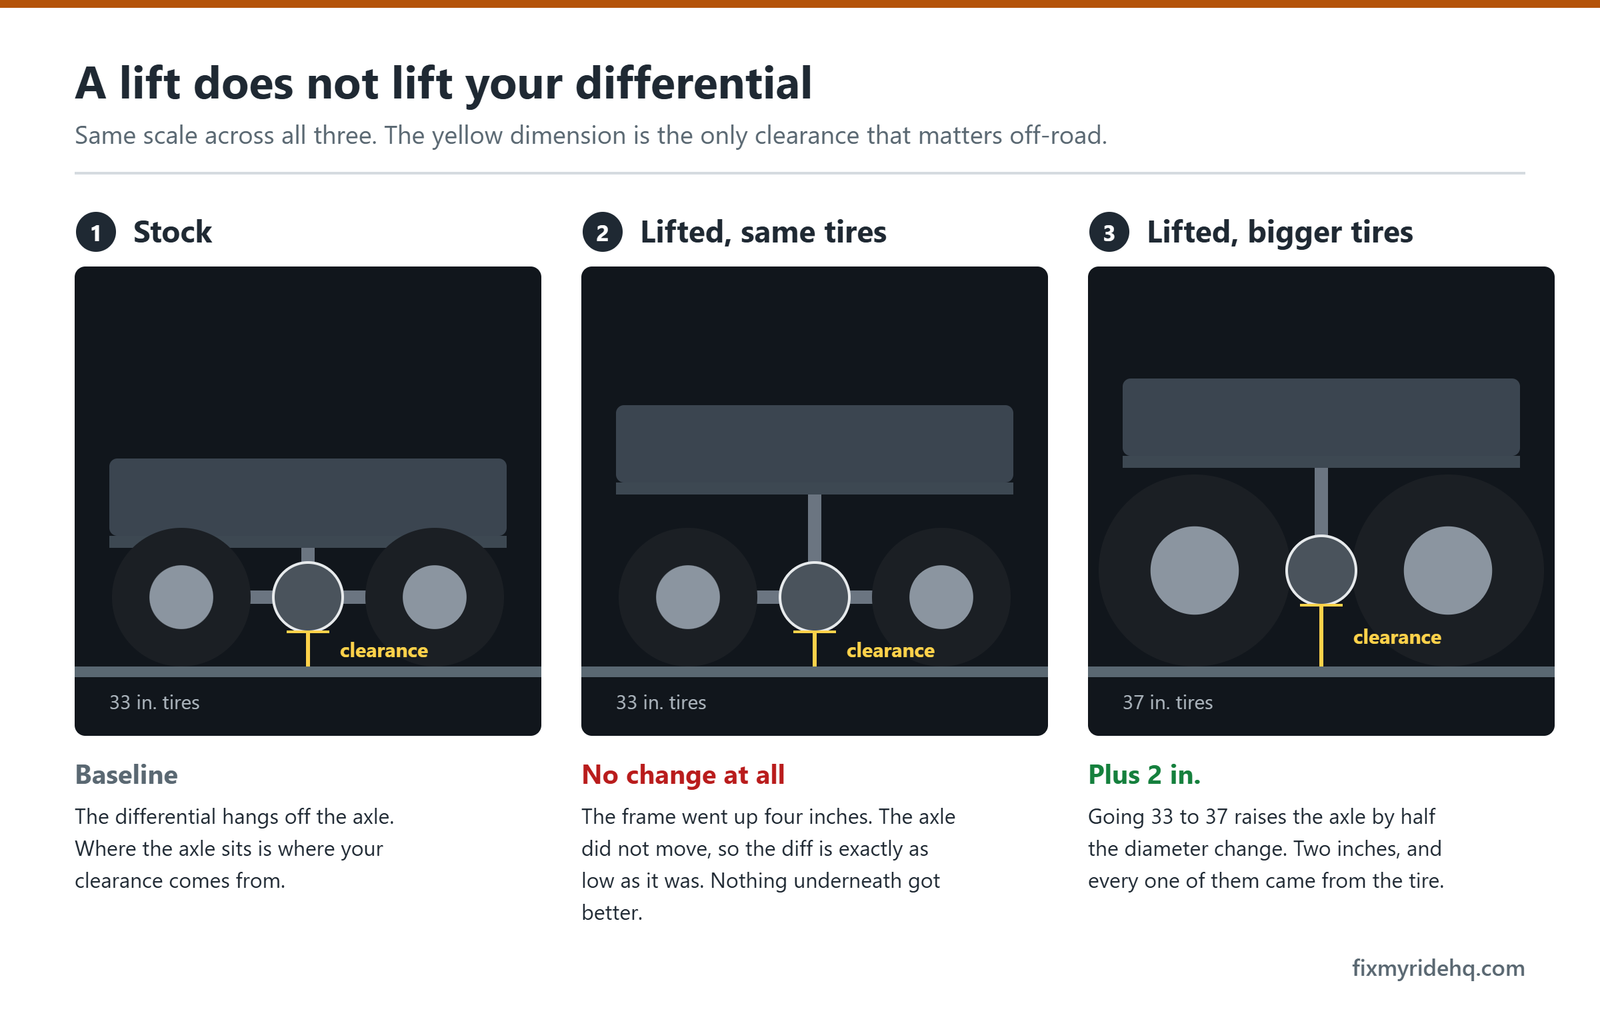
A lift does not increase the ground clearance that matters off-road. Your differential is bolted to the axle, and the axle stays exactly where it was relative to the ground. Raise the truck six inches and the diff is still the lowest thing under there, at the same height it was before. The only thing that lifts the axle away from a rock is a taller tire.
So what is a lift for? Three honest answers:
- Room for bigger tires. This is the real one. The tires raise the axle; the lift keeps them from hitting the fender liner and the upper control arm at full stuff.
- Closing the factory rake. Trucks leave the factory nose-down so they sit level under load. Empty, that looks like the truck is sagging. A leveling kit fixes the stance and nothing else.
- Clearing bigger obstacles with the body. Approach and departure angles genuinely improve, which matters on a steep driveway or a rutted entrance more than people expect.
What it will not do is raise your payload or towing capacity. Those numbers come from the GVWR on the door placard, and no suspension part changes what is printed there. If anything, a lift hurts both, because it raises the center of gravity and lengthens the lever between the hitch and the rear axle.
The three kinds of lift
| Type | Typical height | How it works | What it costs you |
|---|---|---|---|
| Leveling kit | 1–2.5 in. front only | A spacer above the strut, or a taller coil, closing the factory rake | Almost nothing mechanically. Slightly more strut angle, a little ride harshness with cheap spacers |
| Body lift | 1–3 in. | Pucks between the body and the frame. The frame and suspension never move | Visible gaps at the body mounts, and you have to sort out the bumper, steering column, radiator and shifter relationships |
| Suspension lift | 2–8 in. and up | New springs, struts, control arms, sometimes knuckles or a dropped crossmember. The frame genuinely rises | Real geometry changes, real parts costs, and everything in the section below |
One distinction worth holding onto for the legal section: a body lift raises the body but leaves the frame where it was. A suspension lift raises the frame. California measures the frame.
What California law actually says
Almost every article you will read says something like “California allows up to X inches of lift.” That is not how the law is written, and believing it is how people end up cited.
California Vehicle Code section 24008.5 sets a maximum frame height, in absolute inches off the ground, scaled by the vehicle’s gross vehicle weight rating:
| Vehicle | Maximum frame height |
|---|---|
| Passenger vehicles (other than housecars) | 23 in. |
| Up to 4,500 lbs GVWR | 27 in. |
| 4,501 to 7,500 lbs GVWR | 30 in. |
| 7,501 to 10,000 lbs GVWR | 31 in. |
The statute also defines how that is measured, and the definition matters: the vertical distance from the ground to the lowest point on the frame, with the vehicle unladen, on a level surface, taken midway between the front axle and the second axle. “Frame” means the main longitudinal structural members of the chassis — or, on a unibody vehicle, the lowest main longitudinal members of the body. If you are driving a crossover-based SUV rather than a body-on-frame truck, that second clause is the one that applies to you.
Read it again and the practical consequence falls out: the law gives you a ceiling, not an allowance. How many inches of lift you can legally run depends entirely on where your truck’s frame already sits. Two trucks with the same GVWR can have very different amounts of legal room. Nobody can tell you your number from a forum post. Go measure yours, the way the statute says to measure it, and subtract.
One myth worth killing while we are here: the statute ties the brackets to the manufacturer’s gross vehicle weight rating, expressly whether or not the vehicle has been modified with parts the manufacturer did not install. You cannot move yourself into a taller bracket with a payload package, heavier springs or a new sticker. The factory number is the number, permanently.
The rules that apply no matter what you drive
- Body floor within five inches of the frame. Section 24008.5 also says the lowest portion of the body floor cannot sit more than five inches above the top of the frame. Two things about this one: it is what catches a tall body lift, which is otherwise invisible to a frame-height measurement, and unlike the table above it carries no weight limit at all. It reaches vehicles heavier than 10,000 pounds GVWR that escape the frame-height brackets entirely.
- Headlamps between 22 and 54 inches. Section 24400 requires every light source in a headlamp unit to sit no higher than 54 inches and no lower than 22. On a tall lift with a stock bumper, the upper number is a real constraint.
- Taillamps between 15 and 72 inches. Section 24600 sets the same kind of window at the back for vehicles built on or after January 1, 1969. Lift articles cover headlights and forget this one, and it is the sleeper citation on a very tall build.
- Splash protection as wide as the tread. Section 27600 is commonly misreported as a rule that your tires may not stick out past the fenders. It is not. It requires fenders, covers, flaps or splash aprons — or a body that itself affords adequate protection — to effectively minimize spray and splash to the rear, and whatever equipment you use has to be at least as wide as the tire tread. The practical upshot for a wide, aggressive wheel setup is the same (you will probably need flaps), but the legal test is about spray, not coverage.
- Fourteen feet overall. Section 35250 caps total height of vehicle and load. It is not going to bind a pickup, but it exists.
Two things California does not do. There is no bumper height section in the Vehicle Code — California regulates frame height instead, which is the opposite of a lot of states, so do not apply a bumper height rule you read in a guide written for somewhere else. There is a section requiring bumpers at all, 28071, but follow its definitions and it very likely does not reach your truck: it applies to a “passenger vehicle,” and that term routes to section 34710, which excludes four-wheel-drive vehicles and vehicles built on a truck chassis.
And the 24008.5 frame-height table genuinely stops at 10,000 pounds GVWR, with nothing stated above it. Do not read that as open season on a one-ton: the five-inch body floor rule, both lamp-height windows and the overall height cap all still apply, and on very tall trucks those are what actually bite.
Finally, the honest caveats. This is a summary of equipment law, not legal advice, and it is not a complete compliance checklist — it says nothing about CARB or BAR referee exposure for driveline and emissions-adjacent changes, which is its own subject. Vehicle code gets amended (24008.5 was last touched in 1987, 27600 back in 1970), so before you buy a kit that puts you anywhere near a line, read the current text of the sections yourself on Justia or FindLaw and measure your own truck.
What breaks when you go up
Below about two inches, a modern truck mostly shrugs. Past three, the factory geometry starts running out of range and the parts list grows. In rough order of how often each one bites:
- CV axle angle. On an independent front suspension — which is nearly every half-ton and SUV now — lifting the frame steepens the angle the front axles run at. This is the single most common lifted-truck failure. Shafts get hot, boots tear, and they go out well short of their normal life.
- Upper control arm clearance. Past roughly three inches the stock upper arm hits the coil bucket at full droop and the alignment shop cannot get caster back into spec. Aftermarket upper arms are not an upsell at that height, they are the fix.
- Driveline angle. The rear driveshaft now runs at a steeper angle to the pinion. You feel it as a vibration that comes in at a specific speed. Two-piece shafts with a carrier bearing are the worst offenders, and the cure is a carrier drop, shims, or a new shaft.
- Brake lines. Stock lines are cut for stock travel. Lifted, they can come tight at full droop, which is exactly the wrong moment. Extended lines or relocation brackets.
- Track bar and steering geometry. On a solid front axle, lifting without correcting the track bar puts the axle off-center and introduces bump steer. This is the road that leads to death wobble.
- Sway bar end links and ABS wiring. Both get short. Both are cheap. Both get forgotten.
Two more that are not parts. An alignment afterward is mandatory, not optional — budget it into the job. And the center of gravity goes up, which means the truck rolls more in a corner and is genuinely easier to put on its side. That is not a scare line, it is geometry.
Fuel economy drops too, from the aerodynamics, the tire weight, and the effective gearing change covered next. If the truck works for a living, that number adds up faster than the kit cost did.
Tires, gearing, and the speedometer
Since the actual point of a lift is bigger tires, the tire consequences are the lift consequences.
Your speedometer will read low. A taller tire covers more ground per revolution, so the truck is going faster than the dash says. The correction is arithmetic:
Actual speed = indicated speed × (new tire diameter ÷ old tire diameter)
Go from a 32-inch tire to a 35 and an indicated 65 mph is about 71 in reality. That is a ticket you will not see coming, and it also means your odometer is under-counting the miles between oil changes. If you have moved up a size, correct the speedometer, and adjust your maintenance intervals for the difference.
Past about ten percent, you are into regearing. A taller tire acts like a taller gear: the engine drops out of its comfortable range, the transmission hunts, and towing gets unpleasant. The usual rule of thumb is that a tire more than ten percent taller than stock is where you start feeling it. Target ratio works out the same way the speedometer does:
Target gear ratio = current ratio × (new tire diameter ÷ old tire diameter)
| Tire size | Mostly highway | Mixed use | Off-road or towing |
|---|---|---|---|
| 33 in. | 3.73 | 4.10 | 4.56 |
| 35 in. | 4.10 | 4.56 | 4.88 |
| 37 in. | 4.56 | 4.88 | 5.13 |
Treat those as widely used starting points rather than gospel — your engine, transmission and what you actually do with the truck all move the answer. What is not debatable is the cost: regearing both axles routinely costs more than the lift kit did. Find that out before you order, not after.
Two companion pieces worth reading before you order wheels: offset and backspacing, which decides whether the tread ends up outside your fender line, and our all-terrain tire comparison, which covers what you give up on the road as the tread gets more aggressive. If the numbers on the sidewall are not familiar, start with how to read a tire sidewall.
Doing it on three budgets
| Tier | What it gets you | The trade-off |
|---|---|---|
| $ | Leveling kit, 1.5–2 in. front. Strut spacers or a taller coil. Stock tire size or one step up. Alignment after. | It is a stance change with a little extra tire room. No geometry problems, no new parts, and no meaningful capability gain. Be honest with yourself that this is what you are buying. |
| $$ | 2–3 in. suspension lift with the right supporting parts: coils or struts, aftermarket upper control arms, extended brake lines, new end links, alignment. 33s. | Roughly double the parts list of the cheap route, and you probably skip the regear at this tire size. This is the tier that actually works for most people. |
| $$$ | 4–6 in. kit with new knuckles or a dropped crossmember, driveshaft work, regear, 35s or bigger. | You are building a different vehicle. The kit price is maybe half the real number once the driveshaft and the gears are in. Budget those from day one instead of discovering them in week three. |
Our honest take: most people want the middle tier and buy the top one. If the truck spends its week hauling and its weekends on fire roads rather than rock crawling, three inches and a good set of 33s will do everything you need and leave the driveline alone. The money you save there buys the tires, which is where the capability actually came from.
What you need before you start
Safety note. Coil springs store an enormous amount of energy, and a compressed spring that slips will kill you. If the kit requires disassembling a loaded strut, take the assembly to a shop with a wall-mounted compressor. That is not being careful, it is the difference between a Saturday and a funeral. Support the truck on rated jack stands on level concrete, never on a jack alone, and never work under a vehicle held up by anything with a hydraulic seal in it.
- Jack stands rated above your truck’s weight — Amazon link pending program approval
- Torque wrench, 1/2 in. drive — Amazon link pending program approval
- Breaker bar and impact sockets — Amazon link pending program approval
- Penetrating oil — Amazon link pending program approval
- Ball joint separator — Amazon link pending program approval
- Angle finder for driveline angles — Amazon link pending program approval
Every fastener in a suspension has a torque spec and most of them have a sequence. Look them up for your truck before you start, not while the old parts are already off.
Frequently asked questions
How much lift is legal in California?
The law does not work in inches of lift. California Vehicle Code 24008.5 caps your frame height in absolute inches off the ground, scaled by GVWR — 30 inches for a vehicle between 4,501 and 7,500 pounds, for example. How much lift that leaves you depends on where your frame sits now, so the only real answer comes from measuring your own truck.
Will a lift kit void my warranty?
Not automatically. Under the federal Magnuson-Moss Warranty Act and the FTC rule under it, a warrantor cannot escape a warranty claim over a defect unrelated to the aftermarket part, and can only exclude damage caused by an unauthorized part where it can demonstrate the part caused it. So the burden sits with them.
Two qualifications that matter for this audience. When they can show causation — a lift that finishes off a set of ball joints or a transfer case is a fair example — the denial is legitimate, so “they can never void your warranty” is wrong. And that federal protection covers consumer products; a truck bought and titled for commercial use may sit outside it altogether, which is worth knowing before you lift the truck that pays the bills. We are not lawyers and this is not legal advice.
Do I really need an alignment after a leveling kit?
Yes. Even two inches changes camber and caster enough to chew the inside edges off a new set of tires in a few thousand miles. It is the cheapest part of the job and the one people skip.
Will a lift help me tow?
No, and it usually hurts. Your hitch ends up higher relative to the trailer coupler, your center of gravity is higher, and the effective gearing from bigger tires works against you. If towing is the job, a lift is a cost, not an upgrade.
Can I install a leveling kit in my driveway?
A strut spacer kit on a truck with a pre-assembled strut is a realistic driveway job with hand tools, rated stands and a torque wrench. Anything that requires taking a loaded coil apart is not. Read the instructions the kit ships with before you decide, not after the wheels are off.
The bottom line
The tires do the work. The lift just makes room for them. Once you see it that way, most of the decisions get easier: buy the smallest lift that clears the tire you actually want, spend what you saved on supporting parts and an alignment, and measure your frame height before you commit to anything tall.
If you are putting wheels under it at the same time, read offset and backspacing next — getting that wrong is how a legal tire ends up sticking out past the fender. The rest of our exterior work lives in Exterior Mods.
Two companions to this one: the suspension glossary defines every part named above, and wheel and tire packages covers the buying side of the tires that do the actual work.
— Vince T