Disclosure: some links in this post are affiliate links. If you buy through them, we may earn a commission at no extra cost to you. As an Amazon Associate, we earn from qualifying purchases. We only recommend gear we would put in our own trucks.
Interior ambient lighting is the mod that separates a build that looks finished at night from one that only looks finished in daylight. It is also where the cheapest products on the market cause the most problems — flickering, dying strips, and wiring that drains a battery over a weekend.
Done properly it is a few hours of careful work and it transforms footwells, door cards, and the dash at night. Done carelessly it is loose adhesive strips hanging off a kick panel by summer.
Here is how to pick the right lighting, where to hide it, how to power it without killing your battery, and what the law actually cares about.
In this guide
- The three types worth considering
- Where to put it
- Powering it without killing your battery
- Installation that survives a hot truck
- What the law actually cares about
- Doing it on three budgets
- Frequently asked questions
- The bottom line
Vince’s own build photos for this guide are being added.
The three types worth considering
| Type | Look | Best for | Cost tier |
|---|---|---|---|
| LED strip | A visible line of individual diodes unless hidden well | Under seats, footwells, under dash | $ |
| Fiber optic tube | A continuous, even line of light with no visible dots | Door cards, dash seams, console edges | $$ |
| Addressable RGB strip | Per-diode color, chases, and effects | Builders who want animation and app control | $$ to $$$ |
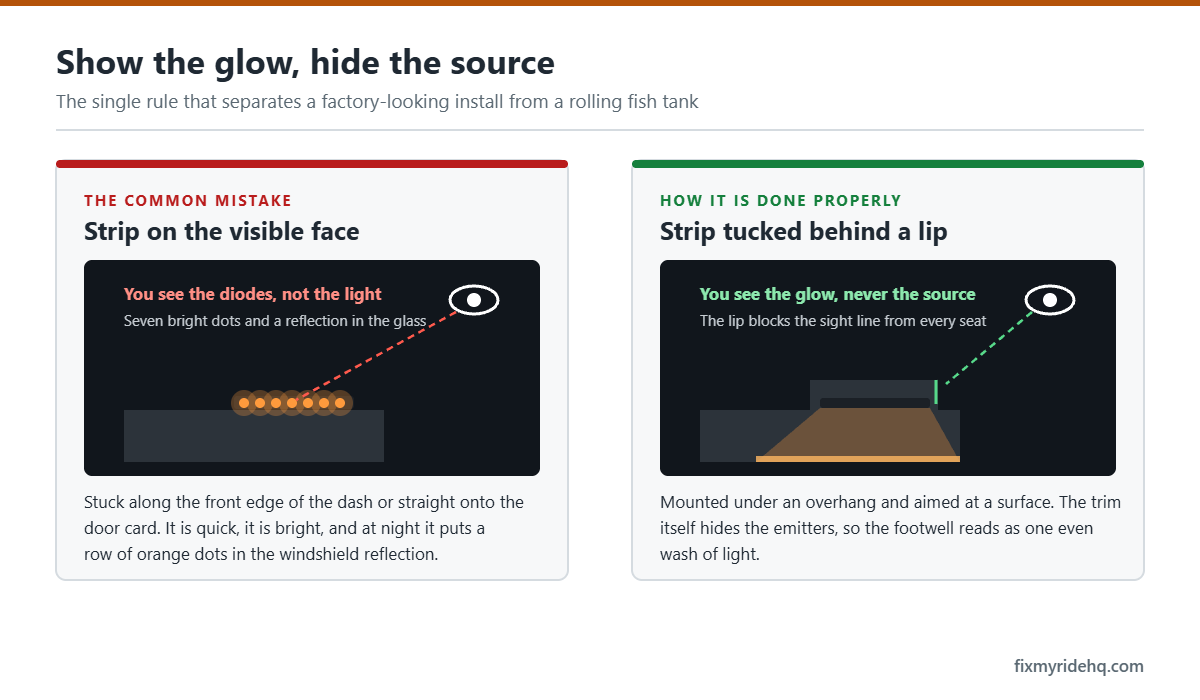
The most common regret is buying plain LED strip for door cards. Because the diodes are discrete, you see a dotted line rather than a glow unless the strip is fully concealed behind a diffuser. Fiber optic tube exists precisely to solve that, and it is what most factory ambient lighting actually uses.
Where to put it
- Footwells — the safest starting point. Mount up under the dash, aimed down, completely hidden from view.
- Under the seats — lights the rear floor, invisible during the day.
- Door card seams — the highest-impact location and the one that wants fiber tube, tucked into an existing panel gap.
- Dash and console seams — effective, but plan the routing before you commit adhesive.
- Cup holders and storage — genuinely useful rather than just decorative.
The rule that makes this look factory: you should see the light, never the light source. Any strip you can look directly at reads as an aftermarket add-on. Every one you have hidden reads as a glow that came with the truck.
Powering it without killing your battery
This is the part that causes real problems, and it is not complicated — it just gets skipped.
- Use a switched 12V source, not constant power. Switched circuits die with the ignition. Constant power means your lighting is drawing current in a parking lot overnight.
- Use an add-a-circuit fuse tap rather than splicing into factory wiring. It is cleaner, reversible, and properly fused.
- Fuse the accessory itself, close to the power source.
- Find a proper chassis ground — bare metal, not a painted surface and not a seat bolt you are unsure about.
- Never tap into airbag, ABS, or restraint circuits. Yellow connectors and yellow loom are off limits.
- Route wires away from pedals, steering column, and seat rails. A wire in the pedal box is a genuine safety problem, not an inconvenience.
If you end up with a parasitic draw and a truck that will not start after a few days, our guides on jump starting and battery terminals will get you moving, but the real fix is wiring it to a switched source in the first place.
add-a-circuit fuse tap kit — Amazon link pending program approval
fiber optic ambient lighting kit — Amazon link pending program approval
automotive multimeter — Amazon link pending program approval
Installation that survives a hot truck
- Plan the full run first, including where wire enters and exits panels, before any adhesive comes off.
- Clean every mounting surface with isopropyl alcohol. Adhesive fails on dusty, dressed, or greasy plastic — and interior plastic is usually all three.
- Do not trust the factory adhesive tape alone. In a vehicle that bakes in the sun, 3M automotive-grade tape or small clips will still be attached next year. The tape that ships with a cheap strip will not.
- Tuck fiber tube into existing seams rather than sticking it to a flat face. Panel gaps hide the source and hold the tube mechanically.
- Leave a service loop of wire at each connection so a future repair does not mean re-running everything.
- Secure every wire run with clips or loom. Loose wire rattles, chafes, and eventually shorts.
- Test before final assembly. Reassembling a door card twice is its own punishment.
Safety note: This is general guidance, not a wiring diagram for your vehicle. Disconnect the battery before working near pillar trim or any restraint components, never tap into airbag or safety system circuits, keep all wiring clear of pedals and steering, and fuse every accessory. Your owner’s manual and factory service information take precedence. If you are not confident with 12V wiring, have an installer do the power side.
What the law actually cares about
Interior lighting rules vary by state, so treat this as the general shape of the concern rather than legal advice, and check your current state law.
The recurring themes are: light visible from outside the vehicle, colors associated with emergency vehicles such as red and blue showing to the front, and anything bright enough to distract the driver or reflect off the windshield at night.
Practically, footwell and under-seat lighting in a neutral color at moderate brightness is the conservative choice while driving. Save the color cycling and full brightness for when you are parked. It also just looks better — at night, subtle reads as expensive and bright reads as a toy.
Doing it on three budgets
| Tier | What you get | Trade-off |
|---|---|---|
| $ — Entry | Basic LED strips in the footwells, fuse tap, single color. Hidden mounting. | No door card lighting, no app control. Still a real change at night. |
| $$ — The sweet spot | Fiber optic tube in the door cards plus footwells, RGB with remote or app, proper automotive tape and loom. | A full day of panel removal and careful routing. Best return for the money. |
| $$$ — Premium | Addressable RGB throughout with door, dash, console, and under-seat zones, app control, effects. | Complexity climbs fast, more connections to fail, and diminishing visual return over the mid tier. |
Our honest take: spend the extra on fiber optic tube for anywhere visible and cheap LED strip for anywhere hidden. Nobody can tell what is lighting a footwell. Everybody can tell when a door card is a dotted line.
Frequently asked questions
Why does my LED strip look like dots instead of a line?
Because it is a strip of individual diodes and you can see it directly. Either conceal it fully behind a lip so only the glow shows, or use fiber optic tube, which is designed to emit evenly along its length.
Will this drain my battery?
Only if you wired it to constant power. On a switched circuit it shuts off with the ignition and draws nothing. This is the single most common wiring mistake in interior lighting.
Can I splice into an existing light circuit?
You can, but a fuse tap on a spare or low-draw switched slot is cleaner, properly protected, and completely reversible — which matters at resale and matters more if anything ever needs diagnosing.
Does the adhesive really fail in heat?
The cheap tape on budget strips absolutely does, and a closed truck in Southern California summer gets far hotter than the ambient temperature. Clean the surface with alcohol and use automotive-grade tape or clips, and it stays put.
Is it worth doing in a work truck?
The useful parts genuinely are. Lit cup holders and footwells make finding things at 5am easier. Whether the color-changing door glow is worth it depends on whether you enjoy it, which is a perfectly good reason on its own.
The bottom line
Hide the source and show only the glow. Fiber tube where it is visible, cheap strip where it is not. Switched power through a fuse tap, fused and properly grounded, with wiring nowhere near pedals or airbags. Clean every surface with alcohol and use tape that survives a hot cab.
Next: starlight headliner install, or browse all interior mods.
Written by Vince T, who runs a delivery and logistics business in Southern California — dump runs, heavy hauling, private delivery. The trucks and SUVs covered here work through the week and get loaded up for the desert on the weekend. More about the site.