Disclosure: some links in this post are affiliate links. If you buy through them, we may earn a commission at no extra cost to you. As an Amazon Associate, we earn from qualifying purchases. We only recommend gear we would put in our own trucks.
A starlight headliner is the single biggest visual change you can make to a truck interior, and it is one of the few builds where doing it yourself saves serious money instead of just serious time. Shops charge a lot for this, and most of that cost is labor you can do in your own driveway over a weekend.
It is also the job people most often underestimate. The fiber optic part is easy. Getting the headliner out of the vehicle without cracking it, and getting it back in without setting off an airbag light, is the actual work.
Here is the honest version: what it takes, what it costs at three different budget levels, and where people ruin their headliner board.
In this guide
- What you are actually building
- Difficulty, time, and what can go wrong
- Safety: read this before you pull a single trim panel
- What you will need
- Step by step
- Doing it on three budgets
- Where people go wrong
- Frequently asked questions
- The bottom line
Vince’s own build photos for this guide are being added.
What you are actually building
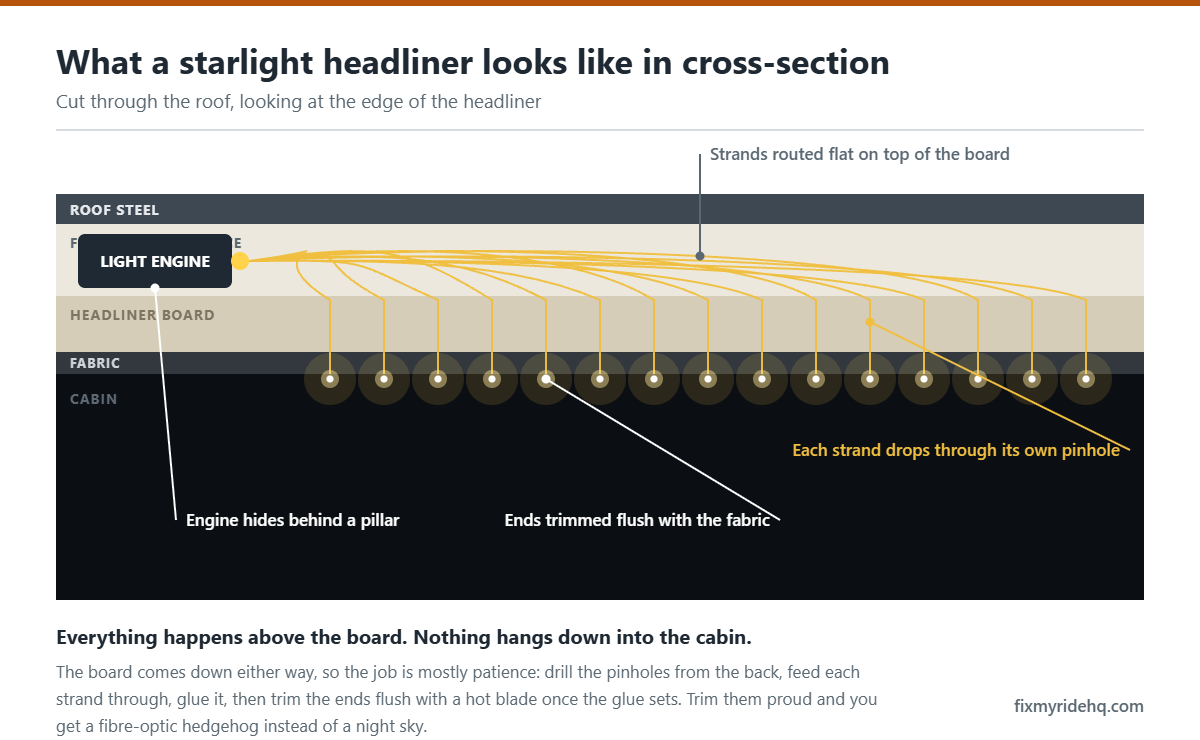
A starlight headliner is a bundle of plastic optical fibers fed through the headliner fabric from behind, with the cut ends sitting flush with the surface. All of those fibers run back to a single LED light engine, sometimes called an illuminator. The engine lights the bundle; each fiber carries a pinpoint of light to the ceiling.
Because the light source is one small box, you can change color, brightness, and twinkle effects for the whole ceiling at once. Better engines add RGBW color, a twinkle wheel, and a separate shooting-star fiber that flashes across the roof.
Typical builds run 200 to 400 fibers for a standard cab. Denser looks push past 500. More fibers means more drilling, more gluing, and more trimming, which is where the hours go.
Difficulty, time, and what can go wrong
| Factor | Reality |
|---|---|
| Skill level | Intermediate. No mechanical work, but a lot of patient trim removal. |
| Realistic time | A full weekend for a first build. 8 to 20 hours depending on fiber count. |
| Hardest part | Removing and reinstalling the headliner board without creasing it. |
| Most common mistake | Cracking the board, or trimming fibers before the adhesive has fully set. |
| Reversible? | Not really. Once the fabric is pierced, those holes exist. |
Safety: read this before you pull a single trim panel
This is the part most build videos skip, and it is the part that actually matters.
- Curtain airbags live in the roof rails. On nearly every modern truck and SUV, side curtain airbags run along the roof line behind the A, B, and C pillar trim. Those panels usually carry a warning label for exactly this reason. Disturbing an airbag connector, or pinching that harness on reassembly, can cause a failure to deploy in a crash or an unintended deployment while you work.
- Disconnect the battery and wait. Disconnect the negative terminal first and let the system discharge for the interval your manual specifies before touching any pillar trim. See our guide on battery terminals for the correct disconnect order.
- Do not cut or reroute airbag wiring. Anything in a yellow connector or yellow loom is restraint system wiring. Route your fiber optic bundle and power wire well away from it.
- Expect an airbag light if you get it wrong. If the SRS light comes on after reassembly, do not ignore it and do not just clear the code. Something is unplugged or pinched.
- Work with a second person. A full-size headliner board is large, floppy, and easy to crease. Creases do not come out.
Safety note: This is general guidance, not a service manual for your specific vehicle. Your owner’s manual and factory service information take precedence over anything written here. If you are not confident working around restraint system components, this is a reasonable job to hand to a trim shop — the fiber work is the cheap part.
What you will need
- Fiber optic starlight kit — fibers plus an LED light engine, sold by fiber count
- Trim removal tools, plastic, not screwdrivers
- Socket set and Torx bits for pillar trim and grab handles
- An awl, leather punch, or small drill bit sized to your fiber
- Hot glue gun and glue sticks rated for high temperature, or a trim adhesive
- Sharp flush cutters or a fresh razor blade for trimming fibers
- Painter’s tape and a marker for laying out the pattern
- 12V switched power source, plus an inline fuse
fiber optic starlight headliner kit — Amazon link pending program approval
plastic trim removal tool set — Amazon link pending program approval
high temperature hot glue gun — Amazon link pending program approval
Step by step
- Disconnect the battery and let the restraint system discharge per your manual.
- Strip the interior trim. Sun visors, grab handles, dome and map lights, sunroof trim if equipped, then pillar covers. Bag and label every fastener by location, and photograph each step. You will want those photos in two days.
- Free the headliner board and work it out of the vehicle. On a crew cab this usually means laying seats down or coming out through a rear door at an angle. Support it across its whole width; do not let it bend under its own weight.
- Lay out your pattern. Work on a clean padded surface, fabric side up. Random spacing reads more like a night sky than a grid, so vary the density and leave some open areas.
- Pierce the holes from the back. An awl through the foam backing is cleaner than a drill for most boards. Go just big enough for the fiber to pass with friction.
- Feed the fibers through from behind, pulling each one a few inches proud of the fabric face.
- Glue each fiber at the board on the back side. This is the step that fails in heat, so do not be shy with a high temperature adhesive.
- Let the adhesive cure fully before trimming. Trimming early pulls fibers back through the fabric, and you cannot easily put them back.
- Trim the fibers flush to the fabric with flush cutters or a fresh blade. Some builders leave them a hair proud and carefully melt the tips for a rounder point of light.
- Bundle the fibers and route them toward where the light engine will live, commonly behind a pillar, above the glovebox, or in the rear.
- Reinstall the headliner with a helper, then reinstall trim in reverse order, keeping airbag harnesses clear and properly seated.
- Wire the light engine to a switched 12V source with an inline fuse. Switched, not constant, unless you enjoy explaining a dead battery to yourself.
- Reconnect the battery and test. Confirm there is no SRS warning light. Our dashboard warning light glossary covers what the airbag light means if one appears.
Doing it on three budgets
This is where most build guides quietly assume you have unlimited money. Here is what each tier actually gets you.
| Tier | What you get | Trade-off |
|---|---|---|
| $ — Entry | Basic kit, roughly 150 to 200 fibers, single color or simple RGB engine, no twinkle. You do all the labor. | Sparser ceiling and a cheaper engine that may buzz or fail sooner. Still looks good at night. |
| $$ — The sweet spot | 300 to 400 fibers, RGBW engine with twinkle, remote or app control, better adhesive. Still DIY. | A weekend of work instead of an afternoon. This is where most people should land. |
| $$$ — Premium | 500+ fibers, shooting star effect, premium engine, possibly a shop install or a professionally re-wrapped headliner. | Cost climbs fast, and most of it is labor you could have done yourself. |
Our honest take: the light engine is worth spending on and the fiber count is worth compromising on. A good engine driving 250 fibers looks better than a buzzing cheap engine driving 500.
Where people go wrong
- Creasing the headliner board. The single most expensive mistake. A replacement board is not cheap and often has to be ordered.
- Trimming fibers too early. Adhesive needs to fully set first.
- Cheap hot glue in a hot climate. A closed vehicle in Southern California summer sun gets far hotter than ambient. Standard glue softens and fibers creep back through the fabric. Use a high temperature adhesive.
- Perfectly even spacing. A grid looks like a ceiling panel, not a sky.
- Wiring to constant power. Leaves the engine drawing current with the truck shut off.
- Forgetting the fuse. Inline fuse, close to the power source, every time.
Frequently asked questions
Do I have to remove the headliner?
For a clean result, yes. People do attempt it in place, working through small sections, and the results are usually visibly worse: uneven fibers, glue on the fabric, and no good way to secure the bundle. If you are not willing to pull the headliner, this may not be the right mod for you.
Will this affect my airbags?
It should not, provided you disconnect the battery, leave the curtain airbag modules and their connectors alone, and route wiring away from restraint harnesses. It absolutely can if you get careless with pillar trim. Take that part seriously.
Is interior lighting like this legal to use while driving?
Rules on interior lighting vary by state, and the common concerns are light visible from outside the vehicle, colors reserved for emergency vehicles, and anything that distracts the driver. Many people run these parked or at low brightness while moving. Check your current state law rather than assuming, and use judgment about brightness at night.
How long does it actually take?
Plan a full weekend for your first one. Trim removal and headliner extraction is often half the job. The fiber work is repetitive rather than difficult, and the cure time between gluing and trimming is not something to rush.
Does it hurt resale value?
That depends entirely on execution and on the buyer. A clean install is a selling point to the right person and a negative to somebody who wants a stock truck. It is not reversible, so go in knowing that.
The bottom line
Spend your money on the light engine, not on fiber count. Use high temperature adhesive because of where we live. Take the airbag warnings seriously, get a second set of hands for the headliner board, and do not trim a single fiber until the glue has fully cured.
Next: more interior mod guides, or browse all builds and mods.
Written by Vince T, who runs a delivery and logistics business in Southern California — dump runs, heavy hauling, private delivery. The trucks and SUVs covered here work through the week and get loaded up for the desert on the weekend. More about the site.