Disclosure: some links in this post are affiliate links. If you buy through them, we may earn a commission at no extra cost to you. As an Amazon Associate, we earn from qualifying purchases. We only recommend gear we would put in our own trucks.
Blacking out faded grey interior plastic is the cheapest meaningful interior upgrade there is. On a truck with sun-bleached door panels and a chalky dash, it costs less than a tank of fuel and takes a Saturday.
It is also the mod with the widest gap between a good result and a bad one, and the difference is almost entirely in preparation rather than product.
Here are the three real methods, which surfaces each one suits, and how to keep it from going patchy or sticky in the heat.
In this guide
- Why truck interiors fade in the first place
- Three methods, honestly compared
- Method 1: vinyl and plastic dye
- Method 2: peelable rubber coating
- Method 3: vinyl wrap film
- Preparation is ninety percent of the result
- Application
- Doing it on three budgets
- Frequently asked questions
- The bottom line
Vince’s own build photos for this guide are being added.
Why truck interiors fade in the first place
UV breaks down the surface of automotive plastics, and the textured grain holds the damage. Southern California sun does this faster than most climates, and a truck that lives outside at job sites gets the worst of it.
Silicone-based protectants make it worse over time. They look glossy on application, attract dust, and leave a residue that fights every coating you might later want to apply. If you have been wiping the dash with a shine product for years, plan on stripping that off thoroughly.
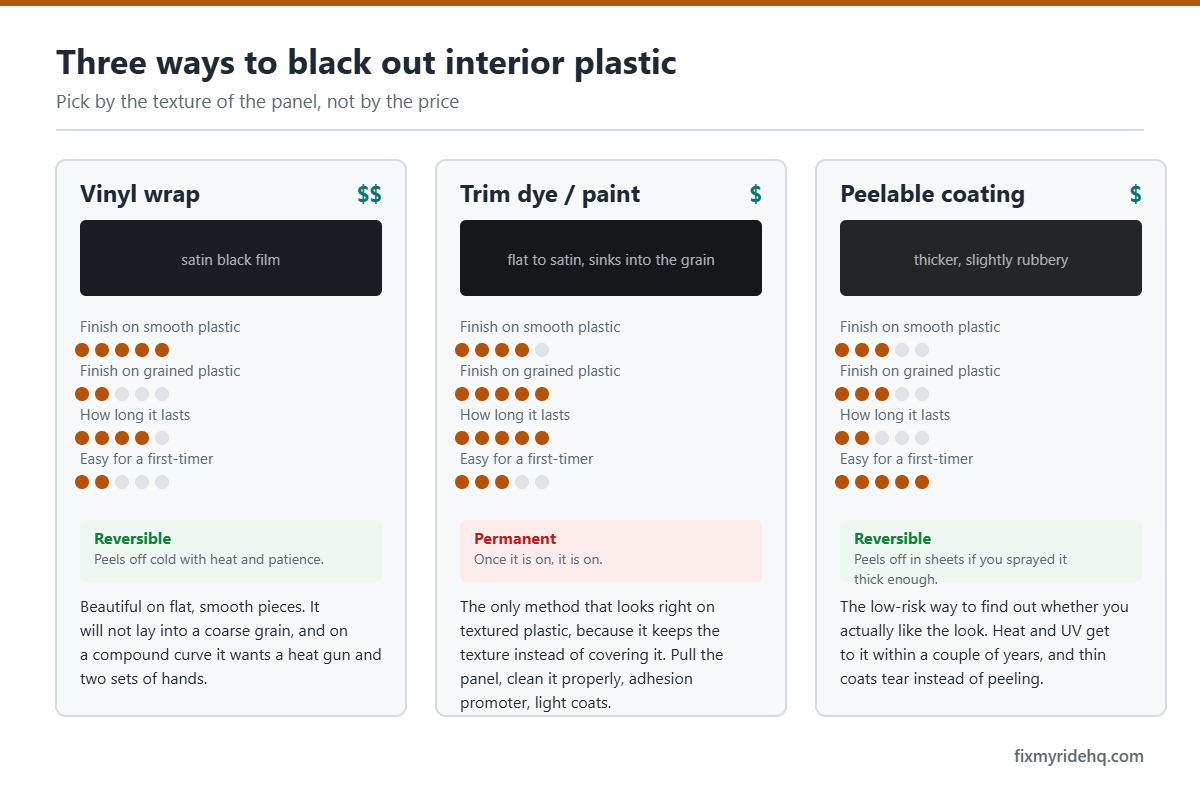
Three methods, honestly compared
| Method | Best for | Durability | Cost tier |
|---|---|---|---|
| Vinyl and plastic dye | Textured plastic, door panels, pillars, dashes | Excellent — bonds into the plastic | $ |
| Peelable rubber coating | Trim you may want to reverse later | Moderate — can peel or discolor in heat | $ |
| Vinyl wrap film | Smooth, flat panels and piano-black trim | Very good if prepped and laid well | $$ |
Method 1: vinyl and plastic dye
This is the right answer for most interior plastic, and it is what people mean when a blackout job looks factory instead of painted.
Plastic dye is not paint. Paint sits on top as a film and can chip or scratch off an edge. Dye penetrates and bonds with the plastic surface, so it keeps the original grain and texture and does not build up a hard shell that flakes.
What it suits: textured door panel plastic, pillar trim, faded dash tops, console surrounds, bumper and grille plastic on the outside too.
What it does not suit: soft-touch coated surfaces that are already peeling, chrome, or anything you want removable.
vinyl and plastic dye spray — Amazon link pending program approval
Method 2: peelable rubber coating
Sprays on as a thick rubber film and peels off later in one piece if applied heavily enough. The appeal is reversibility.
The honest downside for our climate: heat and time work against it. Thin spots bond harder than you want, and peeling later can leave adhesive shadows. It also traps heat and can go slightly tacky on a dash in direct sun.
Use it when you genuinely intend to reverse the change, or you are testing a look before committing to dye.
Method 3: vinyl wrap film
Adhesive film, conformed with heat. On flat and gently curved panels it looks superb, and it is the only method that gives you finishes dye cannot — carbon weave, brushed metal, satin black.
It struggles on deeply textured plastic, because the grain shows through and the adhesive has less flat surface to grab. For heavily grained door cards, dye wins.
interior vinyl wrap film — Amazon link pending program approval
heat gun for vinyl wrap — Amazon link pending program approval
Preparation is ninety percent of the result
Every failed blackout job in existence failed at this stage.
- Remove the panel from the vehicle whenever you reasonably can. Masking in place always shows at the edges, and overspray on glass or upholstery is a bad afternoon.
- Wash it. Warm water and a degreasing soap, with a soft brush to get into the grain.
- Strip old protectant. Isopropyl alcohol, repeatedly, until a clean cloth comes away clean. Years of silicone shine products take more passes than you expect. This is the step that decides whether your finish is even.
- Scuff lightly if the surface is glossy. A fine scuff pad gives dye and film something to bite. Skip this on grained texture you want to preserve.
- Final wipe and dry completely. Any moisture trapped under coating will show.
- Mask what stays. Switch bezels, badges, clips, anything that should not change color.
Application
- Warm, not hot, and out of direct sun. Spraying in full Southern California afternoon sun flashes the solvent before it levels and gives you a gritty finish.
- Many light coats, never one heavy one. Three to four light passes beat one wet coat every time. Heavy coats run, pool in the grain, and stay soft for days.
- Keep the can moving and overlap each pass by about half.
- Respect the recoat window on the can. Recoating outside it can wrinkle the finish.
- Let it cure fully before reinstalling. Touch-dry is not cured. Reinstalling early means clips and panel edges printing marks into your new finish.
Safety note: Dyes, coatings, and solvents require real ventilation and eye protection. Work outdoors or in an open garage, not a closed space, and follow the warnings on the can. Your owner’s manual takes precedence on panel removal for your specific vehicle, and remember that pillar trim sits in front of curtain airbags — disconnect the battery before pulling those.
Doing it on three budgets
| Tier | What you get | Trade-off |
|---|---|---|
| $ — Entry | A couple of cans of plastic dye, prep supplies, and the worst-faded panels done — usually pillars and door cards. | Partial job. You will see the contrast against untouched panels. |
| $$ — The sweet spot | Full interior plastic in dye, plus vinyl film on the flat trim pieces. Proper prep supplies. | A full weekend including panel removal and cure time. |
| $$$ — Premium | Everything above plus a quality wrap film on console and dash trim, or a shop handling the dash. | Diminishing returns. Dye already looks factory when prepped properly. |
Our honest take: this is the rare mod where the entry tier gets you most of the visual win. Spend on prep supplies and a second can rather than on a premium product.
Frequently asked questions
Will dye rub off on my clothes?
Not once it has fully cured. If it is transferring, it was applied too heavily, cured in poor conditions, or went onto a surface that still had protectant residue on it.
Can I do this without removing the panels?
You can, with a lot of masking, and it usually shows. Edges are where the eye goes. For a result you are happy with a year later, take the panels out.
What about soft-touch surfaces that are getting sticky?
That is the coating breaking down, and dye over the top of failing coating will fail with it. The sticky layer has to come off completely first, which is genuinely unpleasant work with isopropyl alcohol and patience. Once it is back to hard plastic, dye works fine.
How long does plastic dye last?
Years, when the surface was properly stripped and scuffed. The failures you see online are almost always prep failures rather than product failures.
Is it reversible?
Dye is not, practically speaking — it bonds into the surface. Peelable coating and vinyl film are. If reversibility matters to you, pick one of those and accept the trade-offs.
The bottom line
Strip every trace of old protectant, remove the panels, and build the color in light coats. Dye for grained plastic, film for flat trim, peelable coating only when you truly want it off later. The product barely matters. The prep is the job.
Next: suede trim wrap pairs well with blacked-out plastic, or browse all interior mods.
Written by Vince T, who runs a delivery and logistics business in Southern California — dump runs, heavy hauling, private delivery. The trucks and SUVs covered here work through the week and get loaded up for the desert on the weekend. More about the site.