Disclosure: some links in this post are affiliate links. If you buy through them, we may earn a commission at no extra cost to you. As an Amazon Associate, we earn from qualifying purchases. We only recommend gear we would put in our own trucks.
Wrapping your headliner and interior trim in suede is one of the highest-impact interior changes per dollar, and it is also the one most likely to fail in a hot climate if you use the wrong adhesive. That is not a small detail. It is the whole job.
Done right, suede turns a plastic-heavy truck interior into something that looks deliberate. Done wrong, you get a sagging headliner by August and a sticky mess behind the fabric.
Here is how to do it properly, what suede is actually good for, where it wears badly, and what it costs at three budget levels.
In this guide
- Suede, microsuede, or Alcantara?
- The adhesive decision is the whole project
- Where suede works and where it does not
- What you will need
- Step by step: the headliner
- Step by step: trim pieces
- Doing it on three budgets
- Living with suede
- Frequently asked questions
- The bottom line
Vince’s own build photos for this guide are being added.
Suede, microsuede, or Alcantara?
These names get used interchangeably and they are not the same material.
- Alcantara is a branded composite suede-look material used by manufacturers. Durable, consistent, expensive.
- Microsuede or suedette is a synthetic suede-look fabric at a fraction of the cost. Quality varies a lot between sellers. For trim pieces it is often indistinguishable at arm’s length.
- Foam-backed suede has a thin foam layer bonded to the back. For headliners this is what you want — the foam hides imperfections in the board and helps the fabric lay flat around curves.
- Genuine leather suede is real hide. Rarely used for headliners; heavy, inconsistent, and unhappy with heat cycling.
For a first project, foam-backed microsuede gives you most of the look at a small fraction of the Alcantara price.
The adhesive decision is the whole project
If you take one thing from this guide: use a high temperature trim adhesive rated for automotive headliner work. Not craft spray adhesive. Not general purpose contact cement.
A closed vehicle parked in Southern California summer sun reaches interior temperatures far above ambient, and the roof is the hottest surface in the car. Standard adhesives soften at exactly those temperatures. That is why you see sagging headliners on older cars here and far less often in mild climates.
Spend the extra on proper trim adhesive. The cost difference is trivial against doing the entire job twice.
high temperature headliner trim adhesive — Amazon link pending program approval
foam-backed microsuede headliner fabric — Amazon link pending program approval
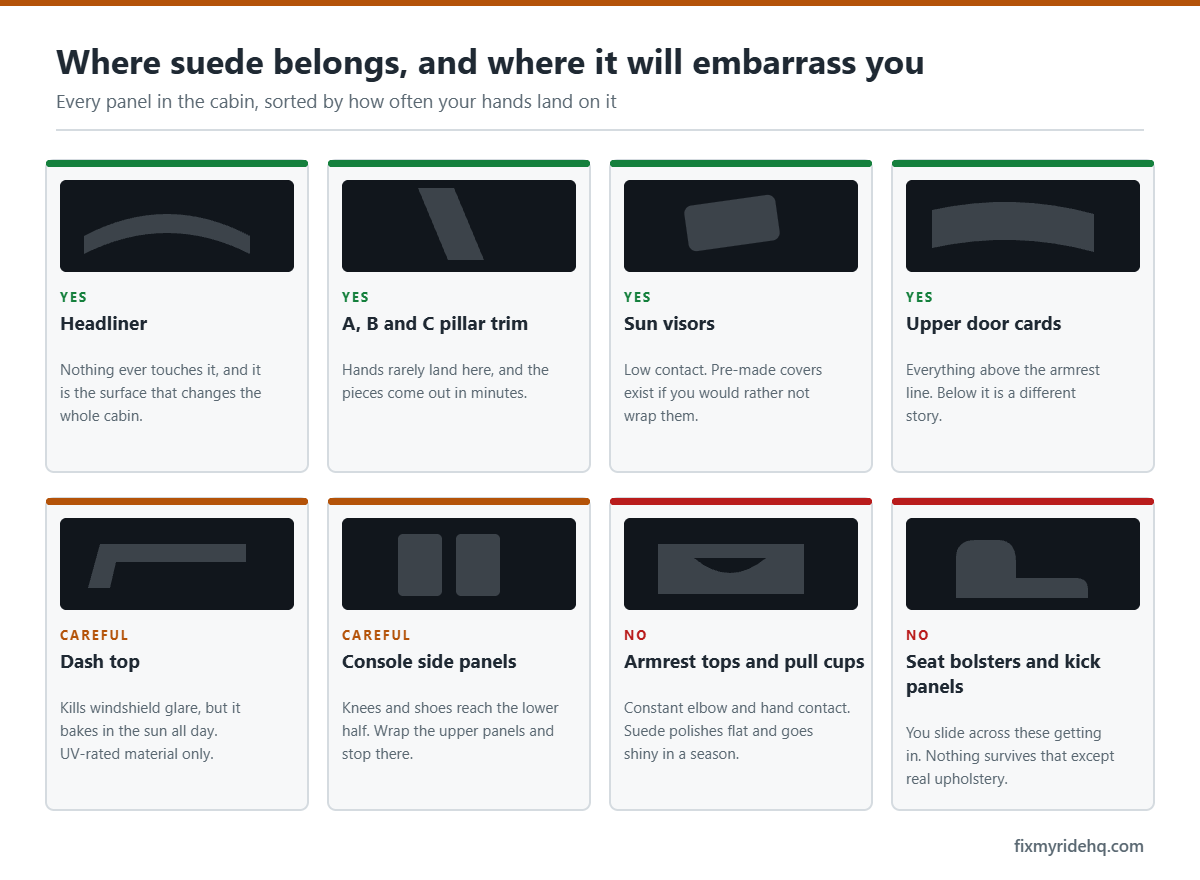
Where suede works and where it does not
| Surface | Verdict |
|---|---|
| Headliner | Excellent. Low touch, big visual payoff, hides nothing you care about. |
| A, B, and C pillar trim | Excellent. Ties the headliner into the rest of the cabin. |
| Door upper inserts | Good. Moderate contact, still looks sharp for years. |
| Center console sides | Mixed. Knees and elbows shine the nap over time. |
| Armrests | Poor. High contact, absorbs skin oil, goes shiny and dark fast. |
| Steering wheel | Poor for a work truck. Looks incredible for about six months, then wears where your hands sit. |
| Seat bolsters | Poor unless you enjoy re-doing them. Sliding in and out destroys the nap. |
Short version: suede belongs where people look, not where people touch. In a truck that works for a living, that distinction matters more than it does in a weekend car.
What you will need
- Foam-backed suede or microsuede, with extra yardage for mistakes
- High temperature trim adhesive
- Plastic trim removal tools
- Wire brush or stiff brush for removing old foam
- Sharp scissors and a fresh razor blade
- Heat gun, used carefully, for stubborn curves
- Gloves, and ventilation — trim adhesive fumes are not friendly
plastic trim removal tool set — Amazon link pending program approval
Step by step: the headliner
- Disconnect the battery before touching pillar trim. Curtain airbags run along the roof rails on most modern trucks and SUVs, and those panels usually carry a warning label. If you are removing the headliner board, read the safety section of our starlight headliner guide first — the same airbag cautions apply.
- Remove the headliner board from the vehicle with a helper. Support it across its full width so it does not crease.
- Peel off the old fabric. It usually comes away easily. The foam underneath is the real work.
- Remove every trace of old foam. This is the step people rush and regret. Decayed foam looks like orange or grey powder and it will not hold new adhesive. Brush it back to clean board. Take your time here.
- Dry fit your fabric over the board with several inches of overhang on all sides. Note where the tight curves are.
- Work in sections. Fold half the fabric back, spray adhesive on both the board and the fabric back, wait for the tack time on the can, then lay it down from the center outward.
- Smooth with your palms, not your fingertips. Fingertips leave marks in the nap.
- Work the curves and recesses gently, stretching only slightly. Over-stretching thins the nap and shows as a shiny patch later.
- Trim the excess with a fresh blade, leaving enough to wrap around the edges, then glue the wrapped edges on the back side.
- Cut openings for dome lights, visors, and grab handles from the back, slightly undersized, then relieve with small cuts so the fabric tucks cleanly.
- Let it cure fully before reinstalling. Follow the adhesive instructions.
- Reinstall with a helper, keeping airbag harnesses clear and correctly seated.
Step by step: trim pieces
Trim pieces are the low-risk way to try this before committing to a headliner. Pillar covers are the usual starting point.
- Remove the piece and clean it thoroughly. Degrease it — adhesive does not stick to armor-all residue.
- Scuff smooth plastic lightly so the adhesive has something to key into.
- Cut fabric with generous overhang on all sides.
- Spray both surfaces, respect the tack time, and lay down from the center of the piece outward.
- Wrap the edges around the back and glue them down. Relieve cuts at corners so the fabric does not bunch.
- Trim flush, and be careful not to wrap so thick that the clips no longer seat.
That last point catches people. Fabric adds thickness. If a panel fights you on reinstall, trim the wrapped edge back rather than forcing the clips.
Safety note: This is general guidance, not a service manual for your vehicle. Your owner’s manual takes precedence. Trim adhesive requires ventilation, and any work near pillar trim means working near curtain airbags — disconnect the battery first and do not disturb restraint wiring.
Doing it on three budgets
| Tier | What you get | Trade-off |
|---|---|---|
| $ — Entry | Microsuede on pillar trim and a couple of small panels. Proper adhesive, small yardage. | Partial look. Great way to learn on cheap pieces before touching the headliner. |
| $$ — The sweet spot | Foam-backed microsuede on the full headliner plus all pillars. High temp adhesive. DIY. | A full weekend, and headliner removal. Biggest visual return for the money. |
| $$$ — Premium | Genuine Alcantara, full headliner, pillars, door uppers, console. Or a trim shop doing it. | Material cost multiplies fast, and Alcantara asks for more careful upkeep. |
Our honest take: buy cheap fabric if you must, never cheap adhesive. Fabric quality affects how it looks on day one. Adhesive quality decides whether it is still up there next summer.
Living with suede
- Brush it with a soft brush to lift the nap. Suede looks bad mostly when it is matted, not when it is dirty.
- Blot spills, do not rub. Rubbing drives the stain into the nap and polishes the fibers.
- Keep armor-all type protectants away from it entirely.
- Expect high-touch areas to shine over time. That is the material, not a defect.
- A sunshade does more for a suede headliner in Southern California than any product you can buy.
Frequently asked questions
Will my headliner sag in the heat?
Not if you removed all the old foam and used a proper high temperature trim adhesive. Almost every sagging DIY headliner traces back to one of those two failures. Craft spray adhesive on a roof panel in summer is a guaranteed redo.
Can I wrap over the old fabric?
No. The old fabric and its decaying foam are the weak layer. Whatever you glue on top is only as attached as what is underneath it, which is nothing.
How much fabric do I need?
Measure your headliner board at its widest and longest points and add several inches on every side, then add extra for mistakes. Fabric is the cheap part of this job. Running short mid-install with a board already stripped is genuinely miserable.
Is suede a bad idea in a work truck?
On the headliner and pillars, no — nothing touches them. On armrests, seats, or a steering wheel in a truck you climb in and out of all day with work gloves and dusty hands, yes. Put it where it gets looked at, not where it gets handled.
Can I do this without removing the headliner?
Trim pieces, yes, and that is a good starting project. The headliner itself, realistically no. You cannot properly clean old foam or wrap edges with the board still in the vehicle.
The bottom line
Remove every bit of old foam, use high temperature trim adhesive, and keep suede away from anything you touch daily. Start with pillar trim to learn the technique, then do the headliner once you trust your hands.
Next: add a starlight headliner while the board is out, or browse all interior mods.
Written by Vince T, who runs a delivery and logistics business in Southern California — dump runs, heavy hauling, private delivery. The trucks and SUVs covered here work through the week and get loaded up for the desert on the weekend. More about the site.